Sunday, October 20, 2013

Chef: Pineapple crush tart


Pineapple crush tart
1 packet crushed Tennis biscuits or biscuits of your choice
approximately 125 g melted butter or  baking margarine
Combine the above ingredients to make the crust in a round pie plate.
I bake the crust for 10 minutes at 180 so that it does not crumble so easily. Place it in the fridge once it has cooled and let it settle for approximately 30 minutes.
Filling
295 g tin of pineapple crush
295 g tin condensed milk
1 pineapple jelly

Dissolve jelly in half a cup of boiling water. Cool slightly.
Add pineapple and juice to jelly and stir well.
Add condensed milk and stir very well until mixture is well combined.
Pour mixture into the crust.
Put in the fridge to set.
Serve with cream or ice cream.


Sunday, October 6, 2013

Entertainer: A personalised tea gathering with friends


Personalise your next tea party for your precious friends. You can set a place for each friend, matching their likes or personalities or just set a unique place for each one of them. I found this great fun to do.

Make your table centre with as many interesting things you find in your home as well as flowers from your garden. I used empty Bovril bottles, a decorated jam bottle as well as an empty Baking powder tin to put flowers into. The sugar was put into a small old biscuit tin. A teapot was also part of the decor.
Here are a few of the individual place settings. I had different tea cups, teaspoons and cake forks that 
matched type of setting, different serviettes, little milk jugs, flowers, teapots etc. Make use of all the special little items you have. Find interesting things you have available.
                            

Now just use what you've got plus a lot of imagination and enjoy yourselves.

HAVE FUN, PLAY!
Life is way too short to miss out on having a good time with your friends.
When a friend offers to bring something to eat, say yes. Variety is the spice of life.

Friday, October 4, 2013

Crafter: My "Spread the Love" shaggy quilt


I made this shaggy quilt for my son and daughter in law.
Their wedding invitation was a bottle of jam and on the label it said, 'Spread the Love.' My quilt was to spread my love with them  in creating something that they could use in their new home.Their guest bedroom is decorated in purples and white and is decorated with relics of their very special wedding.


I used the fabric that they used on top of the bottle to form part of the quilt.

I will take you through the process of making a shaggy quilt.

Firstly you design the quilt drawing a plan on square paper and making sure that you have enough fabric to cut the squares out of.

Be sure to make a 'key' so that you know what each of your pictures mean.Take into account that the quilt is going to 'shrink' once you stitch the pieces together. Insure that your quilt is the correct size or you will be very disappointed. I made this one big enough for a double bed, including an overhang. Rather too big than too small.

You need your selected 100% cotton fabric, good quality batting and whatever fabric you need for the backing: I used a good quality unbleached calico. None of your fabric needs to be washed before making your quilt.Do not use anything but cotton or else you will be disappointed and your hard work will be spoilt. Shwe Shwe does work. Cut all the fabric first and make sure that you have enough squares to match your design.I cut  1 350 squares to construct this quilt!

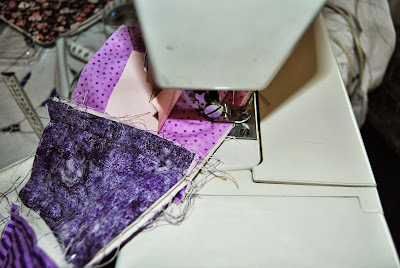
Now stitch the three layers together, going from corner to corner and forming an X across each square. Sew all of the squares like this first. Count that you have prepared enough squares. 

I laid the finished pieces out on the lounge floor, pinned them together and numbered the rows. Do this to check whether you have all the pieces you need.


Next you pin your squares together and be sure to NUMBER each row, THIS IS A MUST! Sew your strips together.

Now join three rows of strips at a time together, but you need to have the seams in a particular pattern. If you would like to make a quilt you can contact me and I will explain this very carefully.Be sure that your numbered rows are correct and check that the pattern is correct and fix any errors you may have made.


Your quilt looks a bit tatty but don't stress, it's going to be fabulous!You now sew all the strips of three rows together. 
Just be warned, this part is hard as the quilt will become heavier and a little tricky to keep straight. Just take your time and work carefully.

Once all the pieces are joined into one complete piece you need to start cutting around the edges. This takes LONGGGGGG and must be done with a very sharp pair of scissors. You must NOT cut into the seams. Approximately 20 cuts per edge are required. I keep a 'time log' for this part... I cut for 14 hours in total! 


There will be threads all over the place so put something over your clothes and the floor around you.


When every edge is cut place your quilt in the washing machine. There will be threads galore in your machine. Be sure to clean out your filter. Shake quilt and get as many loose threads out as possible. There will be LOADS of threads to sweep up. Hang quilt up to dry. Once dry shake quilt out .... more threads all over the place. Wash again and repeat procedure. Wash a third time, adding a softener. Shake out, hang up, shake again. Trim off all cotton threads that may be sticking up. Brush as many loose threads away as possible. Now you are ready to enjoy the quilt on your bed.By this stage it should be soft. The more you wash it the softer it will become and the more the edges will curl: thus a shaggy edge and look.

Well here is the final work of love! The true colours do not really show up well in the photographs.I can't wait to see it on the bed where it is meant to be.